Sunday, 26 May 2013

Ford Model T - Factory Tour Piquette Plant

May 25, 2013

My wife and I had the chance to tour the original Ford Plant in Detroit, Michigan. This factory was built by Henry Ford, and would become the first assembly manufacturing plant in America. I was truly in awe of this building and the history.

The perseverance of it's founders is still alive today. The Model T foundation that owns and operates this property are modern day renegades. This building was in danger of being destroyed. In the late nineties, real estate and zoning laws were changing. The Model T Foundation purchased this building with like minded investors to preserve a building that not only shaped the state of Michigan, but changed the world.

Henry Ford did not invent the automobile, he was only one of 2500 different automobile automakers in the early 1900's. The game changer for Ford was building a car that was affordable to the general population. Fifteen million Ford Model T's were made between 1908 - 1927.

In the below photo's I am standing in the room that Henry Ford and his group of experts created the blue prints for the the car that motorised America the Model T:


I have to say this was truly a lesson in humility. To think that in this very room, some of the greatest minds of that time period created something something so unthinkable to anyone of that time period. A car that could be purchased by a middle class family, outstanding. 

It made me reflect on my own Model T restoration. I will admit that some days I feel like I should just abandon the entire project.  After my visit at the Ford Plant I now know that I could bring my Model T to them in any condition it's in and donate it. In my mind it's sounds perfect to have my T displayed for everyone to see. I am sure I could even have Stew's name on the donation so that he could live on in history. Who knows it might come to that.

For now, I am pressing on. The thought of hearing that engine turn over for the first time in decades is to enticing for me to pass up. 

If your in the Detroit area I encourage you to check out the museum:

http://www.tplex.org/

Thanks,

Adam 

Monday, 31 December 2012

Engine & Transmission

Engine:


It's been a while since my last post and in that time I have done a lot of reading and research.

I decided to refocus my energy on the engine and transmission.  I have been stalking ebay sellers for the last few months and have purchased some essential parts for the motor and transmission.

To recap - I basically started out with an engine block, cylinder heads, valves, crankshaft and an engine head.

I was able to purchase engine parts from a 1919 Ford model T TT ( this was the truck model, but it used the exact same engine) from a  salvage yard in northern Michigan.  These parts included:

Manifold
Manifold intake
Manifold studs
Manifold clips and bolts
Engine head
Engine valve cover plates
Transmission hog's head

I also purchased water Inlet/outlets for both the engine/head, a vaporizer and Kingston L carburetor for stores in Illinois and Kansas.

What's great about all these buys is the parts are all original. Most of the parts I have sanded/repainted with a high heat tremclad enamel paint that is resistance up to 650 degrees.

These are the parts I purchased in Michigan (before painting):

Transmission door, engine valve plates:

 Engine Head:
 Manifold clamps:
 Manifold & below that the intake Manifold:
 Transmission Hogs head:
Vaporizer :

 Kingston L Carburetor:


Here's the engine plates with the paint I am using. The function of these plates is cover the cylinder valves on the left side of the engine. Essentially you can take these off to allow easy access to adjust the valves as needed. Each cylinder has two valves, four per side intake/exhaust.


Here's a pic of the engine block with the plates off, you will notice the valves with the springs on them. The plates cover the valves with a gasket to seal the compartment.


Here is the "almost" completed left side of the engine. On the top right side of the engine head you will notice a round cylinder pointing up. This is the water inlet that is connected to the rad. The long bar at the top of the engine is the manifold, then below is the intake manifold and you will notice that the valve covers have been installed. All three items were sanded down and painted. The carburetor will attach to the intake manifold and you can see a small bolt on the engine block near the base of the intake manifold. This bolt is where the side of the carburetor will attach to the block. 


Unfortunately I don't have the carburetor here yet, it's on it's way from Kansas and should be at my house in the next week, but I do have a picture. This is the actual one I have purchased, and is correct for the 1914 model year. Depending on the time of year and inventory levels at the ford plant a Model T could have come with this carb or  a New Holly carb. I have read quite a few opinions on which carb is better or worse, it seems that people are either in one camp or the other. I bought the Kingston mainly because the L carburetor is specific to the year and this one is in great shape. I haven't seen any other carbs (Kingston or Holly) that are in as great of a condition as this one.  The right side of the carb attaches to the intake manifold the left side is the throttle which attaches to the vaporizer. The top black button will be connected to a rod that sits on the firewall in the front seat of the car. The base of carb is where the fuel line is attached to.

Transmission:

The transmission is probably the part of this car that scares me the most. I have really been avoiding it for the past year.  A few months ago I started reading up on it, and I feel like I have a pretty good understanding of it. It's still a complicated piece of the puzzle, but at the very least I know how it works and I have almost all the parts.

What were looking at here is the flywheel with magneto.  As you notice in the picture there are some screws stuck to the flywheel because its full of magnets. When the flywheel turns the magnets charge the ignition coils which create spark to ignite the engine. So when you crank start the engine, it's turning the flywheel and the magnets to charge the coils to create spark. In the centre of the wheel you will notice four holes, these attach to the drive wheel which attaches to the crankshaft on the engine:  


Here's an upside down view of the engine, the metal circle coming out of the crankshaft is where the flywheel connects. The other side of the engine is the front, where the crank start will be.  When the crankshaft is moving the cylinder heads move up and down creating power. The reason you will see the long screws attached to the drive plate is earlier that day I had the flywheel attached and was using it to turn the crankshaft. 


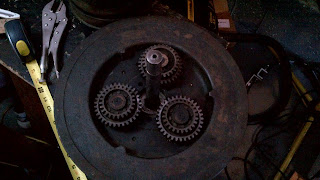
Here's a side view of the flywheel with the gear shaft. The three gears attach to the gear shaft:


I found a seller in Mahah, Nj who was selling old stock of transmission parts. The parts were never used, they were made by a gentleman who remanufactured parts for Ford and other antique car dealers. I didn't really get the story on what happened to him or his business. I did however get some much need parts for my transmission. Most of the parts I needed were related to the clutch but heres a rundown of what I got:

Clutch spring and support
Clutch push ring
Clutch plate with fingers
Clutch shift collar

I also purchased transmission bands from a dealer in Illinois. 

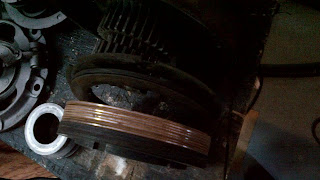
Looking at the below pic, (starting from the bottom up) you have three gears, reverse, low & brake drum. The middle silver parts are all the new parts I purchased. The drive shaft connects at the top end. 
   

Here they are all laid out. 


This is a pic of the flywheel, the magnets you saw before on the other side. The three gear drums connect over the gear shaft and connect with the three gears on the flywheel.


Here is a picture of the transmission bands I purchased. These bands are placed around the gear drums and are tightened with the pedals that are attached to the hogs head. 


The below two pics are completed transmissions. Pic one shows the bands around the drums and pic 2 shows a complete transmission attached to engine.


In my next post I will give a more detailed account of how all these parts work together. 

My new goal for 2013 is to get this engine running on New years eve of 2013/2014. This will mark the 100th year of the car. 

Happy New year everyone!!!


Saturday, 4 August 2012

Steering and Updates!

Hello All!

It's been three months since my last post and I have some updates. 

Engine Head - In my last post I was talking about the engine head and how I was told that due to the deep pitting the head would be unusable. I have done some more research and have found that it might be repairable. Metal can be melted down to fill the pitting and then re - finished for a smooth surface. I am hoping to get this done. It's important to me, to keep the engine original.

Gas Tank - I found a company in Toronto called Gas Tank Restorers. They will take my original tank re coat it and fill in any holes or weak spots. I have been told it will look and function the same as did 100 years ago. The restoration of the old tank is slightly more expensive than a brand new tank, but to me it's worth it.

Let's talk Steering!

I am going to use a few pictures to explain this.


This pic is of the steering mounting bracket. This bracket mounts the steering column to the frame. 


Here is the base of the steering column, the centre cylinder is connected to the steering wheel at the top of the column. The other two smaller cylinders are connected to two levers on the right and left hand side. The lever on the left controls the spark in the engine, and the lever on the right is your throttle which controls the flow of gas and allows you to go faster/slower.


The above pic shows the nuts connecting the steering bracket to the frame. The next picture is the bracket connected to frame top view. 


So as you can see from this pic the base of the column fits perfectly into the bracket.


The column comes in through the firewall, and you can also see how it looks from the driver view. Not to bad!


Now this is only part one of the steering install. Next I have to connect the base of the column to the steering linkage. The linkage connects to the wheel spindles allowing the wheels to turn right or left. I do have a steering linkage, but I need to do some research to get this task completed I might be missing some parts.

The car as looks to today!


In the past three months I have tried to piece this car together best as possible. I took all the original body parts I had and either clamped or screwed them on to the body.


I even put the rear doors on just to see how it would look:


I had starting to sand down some of the quarter panels. The paint on the panels is lead based. The more research I have done suggests that it isn't very safe to be sanding and grinding these original panels. The paint dust is toxic, and even if you wear mask you put that dust in the air who knows where it could travel. In the interest of safety I am just going to buy replacement cut sheet metal. 

Anyway that's it for now, I hope everyone is having a great summer!

Adam


Sunday, 29 April 2012

One day at a time!

Hello Everyone!

It's been an interesting couple of weeks, let's get caught up with some updates.

21 T, Brass Radiator and Wheels:

The 1921 Model T that I purchased back in December has been stripped of all the parts I could use and the remaining metal I sent to the scrap yard. In total I had about six hundred pounds of scrap.

Radiator - I received word from Phillips Rad that my brass radiator was beyond repair. They did a pressure test on it and it exploded the core. I sent the rad to the scrap yard along with the 21 T.

Wheels - I attempted to put together my rear wheels with no luck at all. I had three sets of brake drums that were all either the wrong size or to rusted to use. I sent them to the scrap yard, so I am on the hunt for brake drums which should run me no more than two hundred dollars for a set.

Here is a copy of the receipt from the scrap yard:


I got a hundred dollars for the metal. Not a bad return. The cost to replace the Brass rad is twelve hundred dollars. It's a special order and takes a few months to get. 

On a positive note the new rad looks original, but is much more efficient at cooling.


Engine Head:

I picked up my engine head from Car Quest. I sent it out to get cleaned and machined. Unfortunately I will also need to replace this head. The problem is the pitting of the metal is to deep. There is only a certain tolerance you can grind down, otherwise you will risk losing engine compression. I am in the process of trying to find a replacement. On the high end I am looking at five hundred for a brand new one. Or I can take my chances on another used one.


The above pictures are of the engine head, as so you can see it was cleaned. It's hard to tell from the pictures, but in the top picture anywhere you see a dark tinge is pitting. The darker the colour, the deeper the pitting.

Let's talk Windshield!

In the aftermath of the above, I decided to keep things simple and focus my attention on the windshield.
Originally this car I have was yellow. The windshield frame was a bright yellow with very thick paint (probably had lead in it). It took me about eight hours on a Saturday to grind off the old paint. I also had to use paint remover to get rid of the paint in all the little cracks. It wasn't an easy task, but patience prevailed!

Here is a pic of the windshield the way I received it.


The above two pics are after the hours of sanding and washing with paint remover.
 All taped up and ready to paint!
At this point I am just waiting for the paint to dry!.

In my next post I will be have a picture of the windshield attached to the car. I have attached the wooden body shell back to the frame because I completed all the work on the suspension and springs.


Here is how the car looks today. I am going to continue to work on parts that I currently have. It's getting close to the summer now so sanding and painting will be the focus for the next couple of months. I know originally the focus was to be on the engine only, but now that the rad and engine head are shot I basically starting at ground zero. It's going to take time to find a head and as I said above the lead time on a new rad is at least a couple of months as it is a special order.

Thanks for reading!

Adam